Showing posts with label restart numbering. Show all posts

Restart Numbering when Working with Word Multilevel Lists

Numbered Lists are a problem that Restart Numbering exacerbates – makes a whole lot worse.

If you are interested in how to set up numbering so that it is fairly reliable, go to this procedure:

Setting Up Word Numbering and Multi-level Lists 

If you want to understand how numbering works and what to do when it corrupts, go to this procedure:

Working with Word Multilevel Lists (2007 & 2010)

If you want to understand a little bit more about why Restart Numbering causes so many problems, read on.

“Restart Numbered Lists” is Buggy
I am not sure if everything to do with numbered lists is buggy, but restart numbering is certainly buggy. Word MVPs admitted this for 2003, but there is a deafening silence from Microsoft for the issue in 2007/10.

I cannot promise you this will solve all your problems, but it might help.

Some Revision on Setting Up Lists
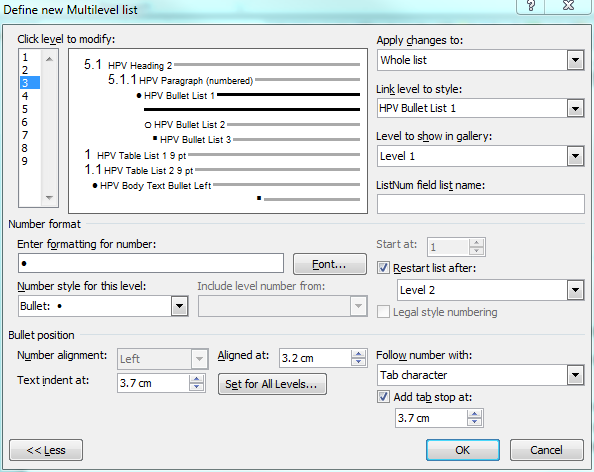
In my previous articles I explained how I set up all numbered lists AND bulleted lists in a single Multilevel List Gallery Box, as shown.


I have been working on a set of styles for a particular document when I can actually manage to get all my styles into a single box.

The image to the right shows how this looks.

There are a few peculiarities with this list, but it does show how the system can handle complexities.
  1. Note that every level of this list I am using is associated with a paragraph style. You cannot see this, but the formatting of the margins and tabs for the paragraph style is identical to the margins and tabs shown here. They must be or your list will corrupt. 
  2. Note that my document starts as part 5 so I have placed that number in manually. 
    1. Level 1 numbering starts with 5.1. 
    2. Level 2 numbering is 5.1.1 Level 2 is dependent on Level 1 as shown in this image: 
The 5 never changes – I have typed it in manually.

The “Restart list after:” field
The critical field I am pointing out is “Restart list after: Level 1”. This causes the numbering to return to 1 when the level above increments. This means it goes from 5.1.1, to 5.1.2, to 6.1.1.

If your standard lists are not set up like this, go back and fix them before you continue.

Use Setting Up Word Numbering and Multi-level Lists as a reference to do this correctly.

Bullets and the “Restart list after:” field
Note that the next level after my two numbered headings is a Bullet 1. It is not dependent on the numbering but as it always occurs after my Level 2 numbering, I have put Level 2 in the “Restart list after” field. I’m not sure it is necessary, but it doesn't hurt. Sometimes we just have to do things in Word that don’t make much sense. Don’t do this if you don’t want to, but if things go pear shaped, go back and put it in. It might help.

The next level is a Bullet 2 which is dependent on Bullet 1. So this is and must be set to Restart List after: Level 3. The same applies to Bullet 3 which must restart after Level 4.

Table Lists and the “Restart list after:” field 
Now this is where the trouble starts. My table lists are not dependent on anything. Wherever I have a table, I may need a list, and then again, I may not. I have a Paragraph style to apply the list and it works just fine until I get to the second instance of the list.

When I press “Restart Numbering” to set it to “1” manually, sometimes it works and sometimes all my lists and margins throughout the document are re-set to something seemingly nonsensical.

In this document, my numbered tables happen to all occur in different chapters so I have put Level 1 in the “Restart list after:” field. Find a List Level to put here. You will need to look and see if your tables with auto numbering in them all start after a particular list level, and use that list level here.

Restart Numbering
If you have not already done so, you can place the Restart Numbering button on Quick Access Toolbar.
  1. Right click in any blank area of the Ribbon. 
  2. Click Customize Quick Access Toolbar. 
  3. In the Choose Commands from field, click All Commands. 
  4. Scroll down to Restart numbering and highlight. 
  5. Click Add. 
  6. Click OK. 
Conclusion
That’s it. No promises, but your numbering will be more robust than it was before if you do all this.

Note that I have not promised that it will be robust, just that it will be more robust than it was.

There may be an easier way of setting up robust numbering, but this is the path I went down and followed through.

If you find anything easier AND more reliable, please let me know.

Alternatives
If you don’t like my instructions you can try these.

Shauna Kelly
http://shaunakelly.com/word/numbering/numbering20072010.html

As I normally find myself modifying an existing List Style in dirty pre-existing templates and not creating a new one, I rarely find myself starting from this point, but if you have totally clean templates to work with, you may want to.

My instructions modified 
You can use my instructions and try multiple style gallery boxes for different lists which will get around the restart numbering problem, but which brings a different range of issues with it.

SEQ number fields 
If you don’t like either of them, you can use SEQ fields instead of Multilevel Numbering. The professional technical writers responsible for huge documents do this – they have no choice. There are some good instructions here.

http://cybertext.wordpress.com/2010/03/08/word-2007-setting-up-seq-fields-for-numbering-pt-1/ 

If you choose to do it any of the four ways I know of, you have a big set-up at the start to avoid problems down the track. Bite the bullet and take the time to do your set-up properly. You won’t regret it.

Working with Word Multilevel Lists (2007 & 2010)

In my previous article on Multilevel Lists, I explained how to set lists up. There are no shortcuts.
  • It is imperative that you have all numbered lists for a single template in a single “style box” set up as instructed in my previous article.
  • If at all possible, it is also good idea to have all your bulleted lists in that same single “style box”. It is irrelevant if they are dependent on one another or not.
The illustration to the right shows the Multilevel List Gallery with all lists in a particular document, both numbered and bulleted, within a single “style box”.

Here is the link to how to set up Multilevel List. As you can see, I wrote this in 2008 and it still applies. Setting Up Word Numbering and Multi-level Lists

The Problem
How many of us have experienced this? We are approaching a deadline for delivery of our large document with complex numbered lists, when Word decides to throw all the formatting and sometimes all the numbering of our carefully formatted lists to the wind. At least, that is how it seems. How many of us have worked an “all-nighter” courtesy of Word numbering?

Most of the time it is not as irrational or unpredictable as we think, but the rules are so complex that we are likely to do something to trigger a problem without knowing it.

However, all is not lost. We are able to take some level of control to minimise the problem and the time spent fixing it, IF we pay attention to the rules. Like so much else in Word, it comes down to setting up your templates correctly in the first place.

Setting up your Numbered Lists Display
When you click on Multilevel Lists from the Home tab, the Gallery displays three sections:
  • Current List
  • List Library
  • Lists in Current Documents
You can control which lists display in this display. You can choose to display one of them or all of them.
  1. Click Multilevel Lists.
  2. Roll your cursor over the word ALL at the top of the Gallery so that it colours.
  3. Click All.
  4. Select List Library. Read further to learn how to set this up to display only your correct “style box”.
So, why does it matter which lists you are working from?

How the Numbered Lists Display Works
Current List
Once you have set up all your numbered and bulleted styles in a single “style box”, place your cursor on some text that has been formatted with one of those styles. Click on the Multilevel List Gallery. The “style box” for that style will show under “Current List”.
  • If your numbering has gone haywire, with your cursor in that numbering, look at your Current List. It is probably the wrong list. You can apply the correct list, if you know which one it is. But wait…
List Library
You can set up a library of acceptable “style boxes”. If you have managed to get all your styles into a single “style box”, you can delete every option except that “style box” from your List Library. You can control this List Library to make sure you can use the List Library to apply the lists you actually want for your document – hopefully only one list.
  • Find the correct “style box” in your list library, and, with your cursor in the haywire numbering, click on the correct “style box”. If you are very lucky, your problem is magically fixed. If not, read on.
Lists in Current Documents
Unfortunately you have very little control over the “style boxes” that display in this area. Even if you go through an entire document, clear all formatting and re-apply your chosen list style throughout, there may still be some “style boxes” you do not want in this menu at the end of the exercise.

If you have a second document open, the “style boxes” from that document also display. This means you are doomed to have the “style boxes” from both your documents also displaying in this area.
  • Never apply numbering styles for any “style box” in this area. Make sure you have the correct “style box” in your “List Library” and stick to it.

How we mess up our lists in the first place
Importing data from another document
The most common way we mess up lists is by importing data into our document from another document.

When we import from that source document we are likely to bring in the “style boxes” from that document. These may over-rule our chosen “styles box”

We must avoid importing text that includes coding for the numbered list in the first place. There is only one 100% reliable way of doing this. There are two other ways which we might imagine do this but which do not.
  • When importing text, if you use the Paste Options box at the bottom of your pasted text, you are given a range of options depending on the type of data you are importing. NEVER use these in a document with numbered lists. Remember that style box that is attached to a numbered list? Well, even the Keep Text Only option brings the numbered list with it.

  • Are you aware of Paste, Paste Special, Unformatted Text, that you can select from the Ribbon? Plenty of people have told me it strips out all formatting. It does seem to, most of the time, but I have managed to retain paragraph formatting using it, so what else is retained? It is pretty good – you can risk it, but not on the day before publication of a massive document.

  • The only absolutely reliable way of stripping out all formatting is to use Notepad:
  1. Open Notepad.
  2. Copy or Cut the desired text from the source document.
  3. Paste into Notepad. This does strip out all formatting.
  4. Copy or Cut the desired text from Notepad.
  5. Paste into your destination document.
Conclusion
In this article I do not claim to understand all the vagaries of Word numbering, but if you create your numbered lists as explained here:

Setting Up Word Numbering and Multi-level Lists

…and if you follow the advice in this article, you are likely to significantly reduce the issues you face. This is one of those cases where the time spent setting up your computer and your templates correctly, WILL repay you tenfold in the time it takes you to “fudge” corrupted documents when they do something they should not.

Keystroke Options
Open Paste Options
For those of you who use keystrokes, you can use this combination to open the Paste Options box and select the required option:
  1. Press Ctrl+V to paste the text into your document as per normal.
  2. Press Ctrl again open the Paste Options icon.
    1. Press T to select the “Keep Text Only” option (pressing t is a separate action to pressing Ctrl in step 2 — DO NOT press them together otherwise it won’t work).
    2. M for merge formatting
    3. U to paste it as a picture and so on. 
  3. OR Press the arrow keys to switch between them.
Open Paste Special
Alternatively you can open the Paste Special Dialog with Alt Ctrl V, then select Unformatted Text.

Quick Access Toolbar Options
You can put most of the Paste of options on your Quick Access Toolbar.
  1. Right Click on your Quick Access Toolbar.
  2. Select Customise Quick Access Toolbar.
  3. From Choose Commands From, select All Commands.
  4. Scroll down the list to Paste and you will see lots of options.
  5. Click on the options you want and copy to save, for example Paste and Keep Text Only.
  6. Click Add to put onto your QAT.
  7. OK to return to your document.