Bullets and numbering pose a problem in Word. They are complicated. Word tries to be very helpful and predict what you want, with sometimes very peculiar consequences.
It is easy enough to insert bulleted lists or numbered lists, but it is not so easy to control exactly how they look and behave once you are working with larger or more complex documents.
If you don't use styles...
...then your best course of action is to do the Microsoft on-line training to learn exactly how Microsoft intends you to use them. There are good PowerPoint instructions, but you must be using Internet Explorer Browser to access them.
- Click this link. Training presentation: Word 2007—Bullets, numbers, and lists
- Click the Download button, save, and print if required.
- Follow the instructions and good luck. If you are writing small documents and not sharing them with others, this system will probably work for you.
...there are two main tricks to getting this right:
- If you are working in a document that has lots of complex lists, use the built-in Multilevel List styles and re-define them to suit.
- Associate those styles with a single gallery box from the Numbering Library accessed through the Ribbon.
- Create a new document based on Normal template.
- Click Home tab, Styles group, dialog box launcher, to display the Styles pane and see all the styles displayed.
- Click Manage Styles to display the Manage Styles dialog box.
- Click the Recommend tab.
- Scroll down the list to near the bottom where you will find styles starting with the word List. They are likely to be greyed out and have the words (Hide Until Used) next to them.
- Highlight all these items and click Show .
- Click OK.
Work out what numbered lists you want and how deep you want them to go. For example, I often use a three level list for normal text, a three level list inside tables and a third three level list for special formatting, which makes 9 styles in all.
- Apply the pre-defined list style to some text.
- Re-format the text to look the way you want.
- Locate the style in the Styles pane.
- Right click and click Update *style name* to match selection. The style now possesses the formatting of your selected text which will be applied to all other text formatting with that style.
- Right click on style in Style pane.
- Change the name.
- Click OK.
- Click Home tab, Paragraph group, Multi-level list button down arrow.
- Identify and click a number format from the Numbering Library that is closest to the required numbering style.
- If you exit the dialog box, click Home tab, Paragraph group, Multi-level list button down arrow again.
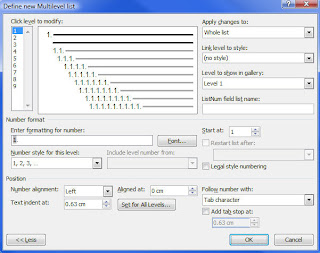
- Ensuring your selected box is still highlighted, click Define New Multi-Level list. You will work in this dialog box to define how every numbered list you have will work.
- With level 1 selected, click the More button.
- In the Link level to style box, select your first style in a sequence, for example "table list 1".
- In the Enter formatting for number, enter the numbering type you want.
- In the Start at field, enter the start number, usually 1
- In the Aligned at field, enter the identical left margin defined in the style.
- In the Text indent at field, enter the identical indent defined in the style.
- In the Add tab stop field, enter the same indent tab defined in the style.
- Click level 2.
- In the Link level to style box, select your second style in a sequence, for example "table list 2".
- In the Enter formatting for number, enter the numbering type you want.
- In the Start at field, enter the start number, usually 1
- In the Aligned at field, enter the identical left margin defined in the style.
- In the Text indent at field, enter the identical indent defined in the style.
- In the Add tab stop field, enter the same indent tab defined in the style.
Place re-start numbering button on Quick Access Toolbar
- Right click in any blank area of the Ribbon.
- Click Customize Quick Access Toolbar.
- In the Choose Commands from field, click All Commands.
- Scroll down to Restart numbering and highlight.
- Click Add.
- Click OK.